Hi everyone! I hope you’re all doing well! If you didn’t know, spring break is creeping up on the Marywood community, and it is definitely hitting me! I’m excited for a break, but spring break always means midterms and cramming for due dates. Especially in the ceramics studio, it’s the beginning of the end of the “wet work window,” so I have to be especially intentional about what I put my time into. Winter break is usually fine because 1 month is tolerable, but the summer break is horrible. 4 months away from the studio. My worst nightmare. On top of that, I probably won’t update my Etsy shop until I decide what to include in my senior show next spring. I don’t want to sell everything and then have nothing to exhibit in the show! So, basically, no ceramics for 4 months, even including selling my work. Luckily, I can always plan projects ahead of time, especially my new series of lighthouses, which I’ve been having a lot of fun with. I’ve made a lot of progress with my explorations and am super excited to show you what I’ve been up to.
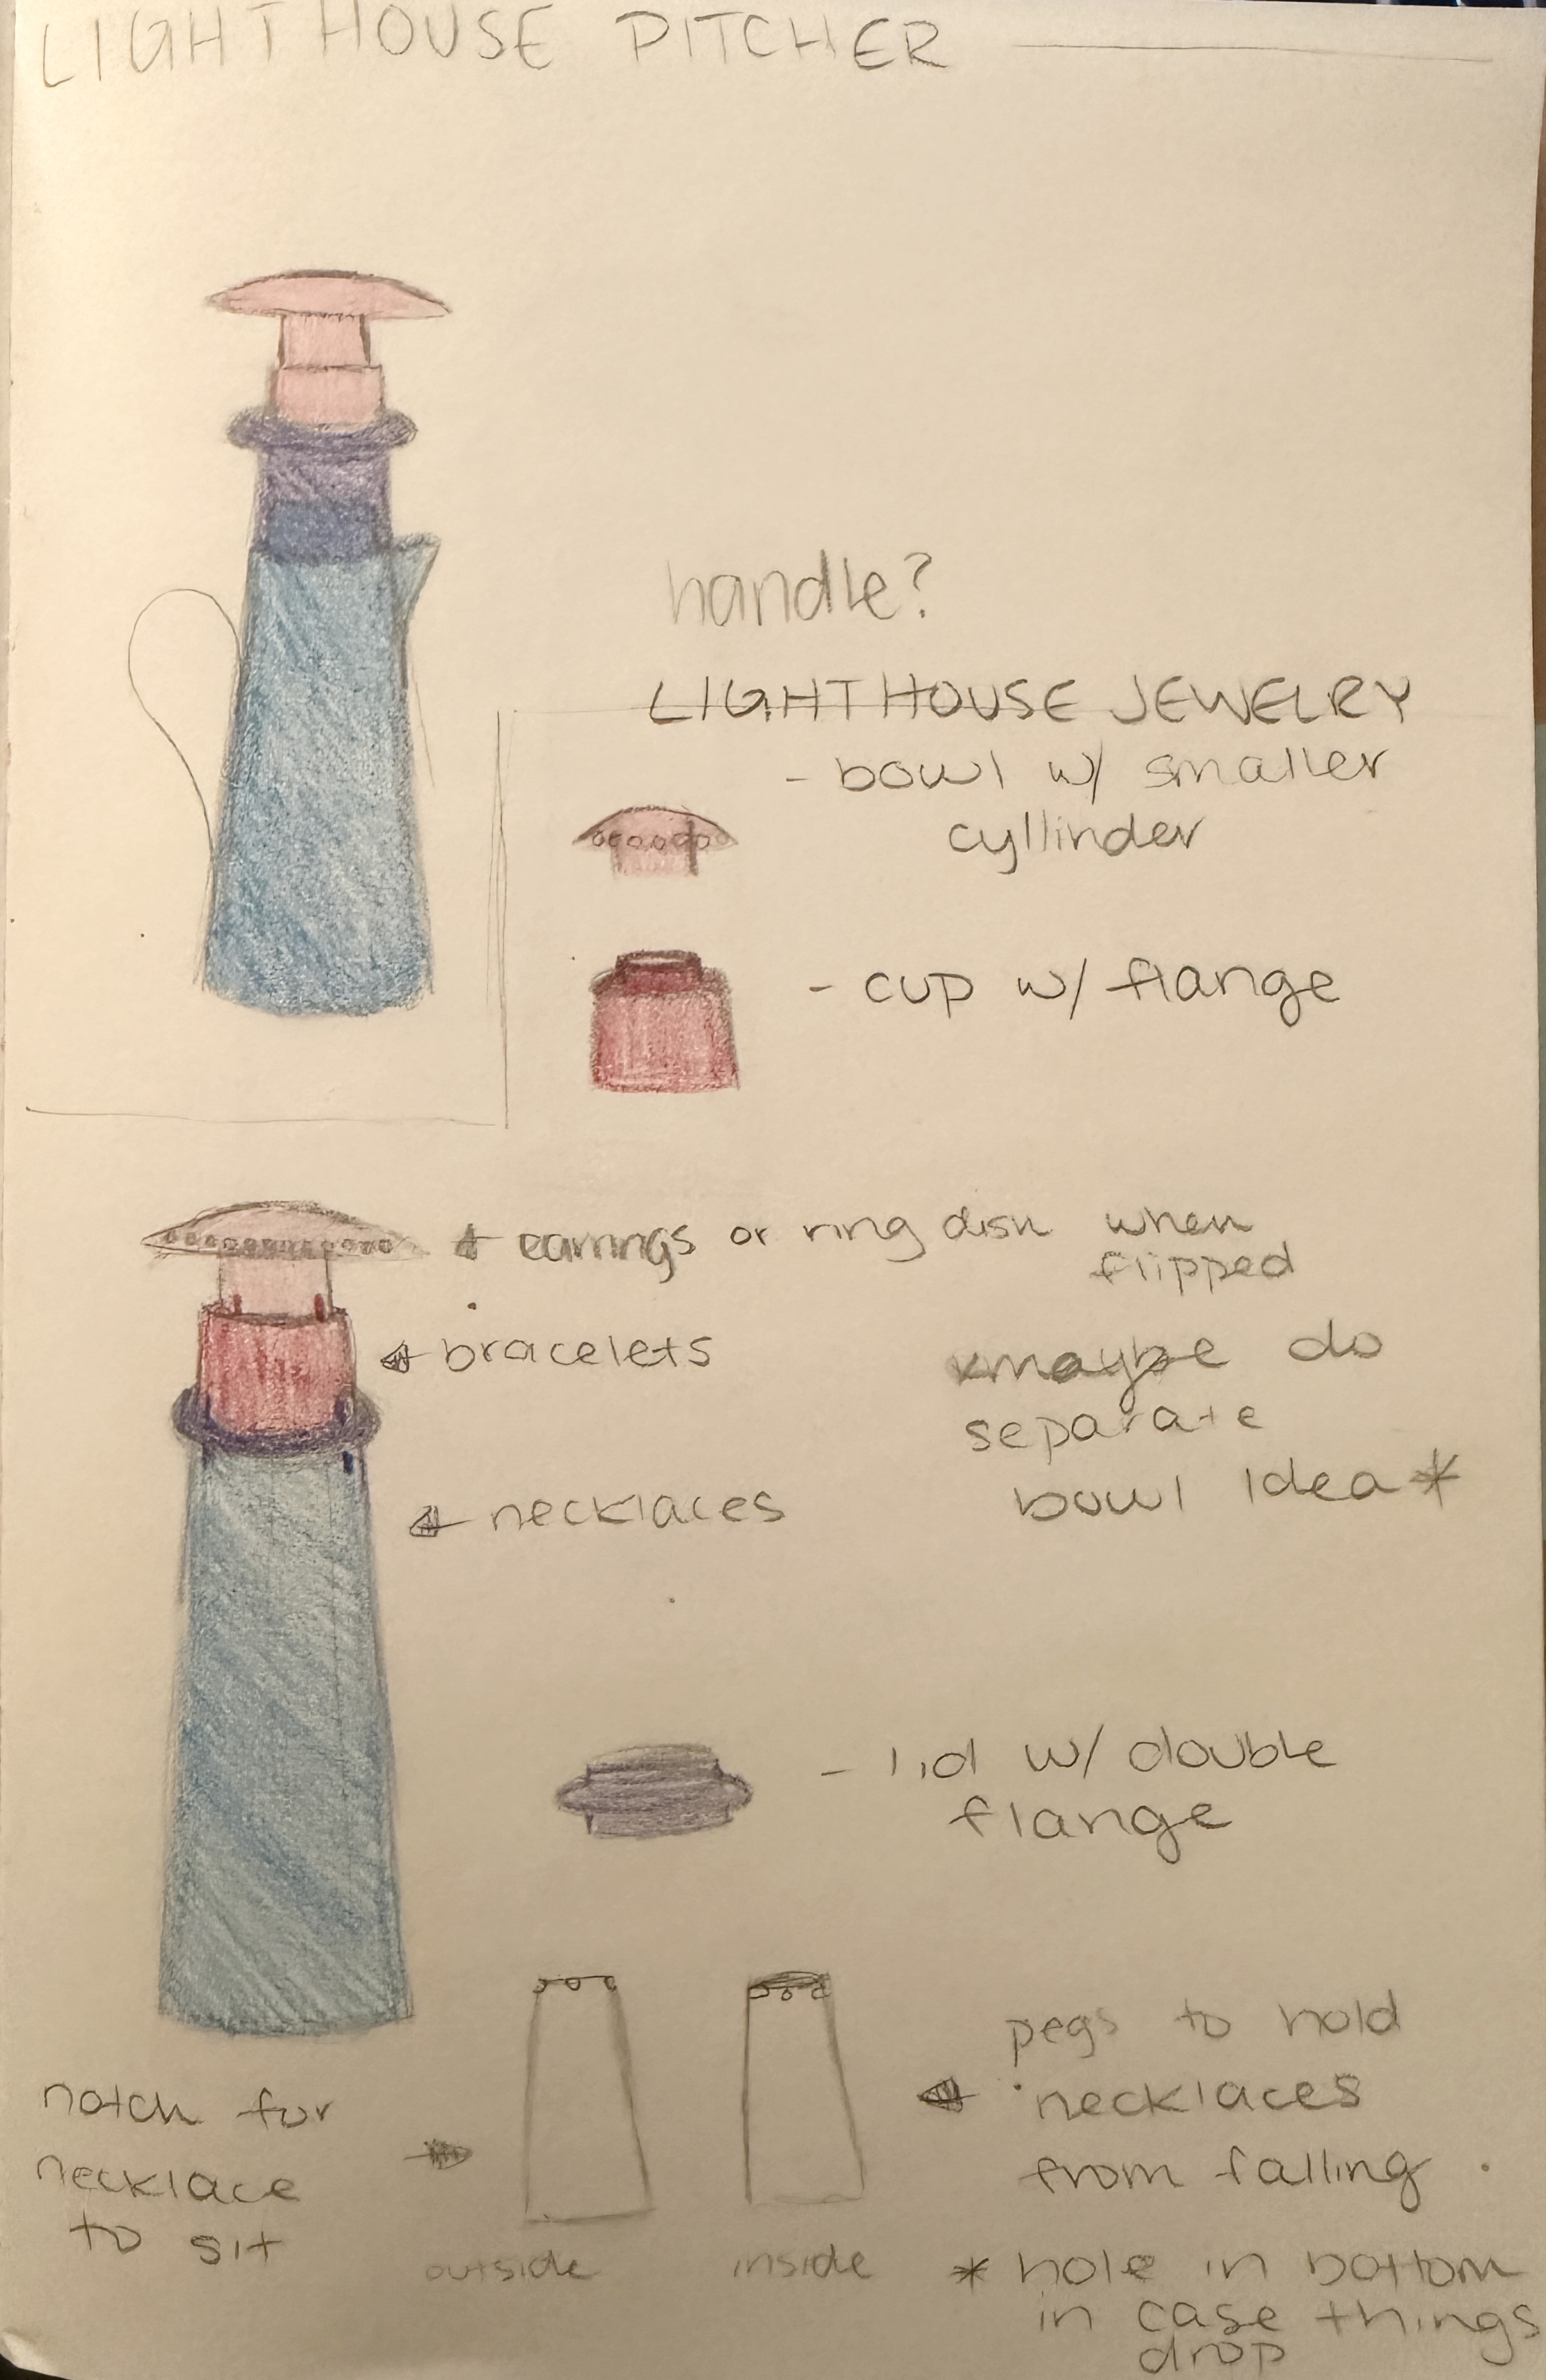
In my last post, I mentioned that I would brainstorm different functions for my lighthouse series. I mentioned specifically a tea light holder and pitcher set, but I came up with a couple more ideas that I’m extremely excited to execute. First, I came up with a jewelry holder, and I couldn’t have been more eager to make it. Some of my other ideas were both lamps with and without shades, trinket shelves, and stacking storage bowls. I’m not going to lie, I already bought a couple of lamp kits so that I could make the lamps. I’m just so excited about them, so I had to be prepared! Before those lamp parts came in, though, I sketched out my ideas for the pitcher set and jewelry holder because I was also really excited about those. I didn’t follow my plans exactly in the end, but they still came out pretty close to what I expected. Here’s a look at my plans:
First, I made the pitcher because I was more intimidated by it. I’ve made pitchers in the past, but it was a little bit more complicated because the cups had to nest on top of it. I knew from the beginning that this wouldn’t be super functional in the sense that the cups would be ridiculously bulky, but I still wanted to try and make it look functional if that makes sense. Throwing the pieces for this lighthouse was relatively the same as what I was doing for the previous ones. Most of the work, honestly, came after throwing, because I had to hand-build the spout and attach a handle to the pitcher. Usually, I would just make the spout while the piece was still on the wheel by bending the lip into the necessary shape, but because the pitcher had to have a flange for the cup to nest on top, I couldn’t really do that. I probably could have made it work, but I didn’t want to risk it at that point. As a non-hand builder, I think it turned out really great! Unfortunately, as the middle piece was drying, it cracked, but it’s okay because this lighthouse was mostly experimental. I left the bottom too thick when I trimmed it, which caused the crack, but it hasn’t cracked all the way through yet, so I can at least keep it as a display piece. Here’s a peek at what it looks like.
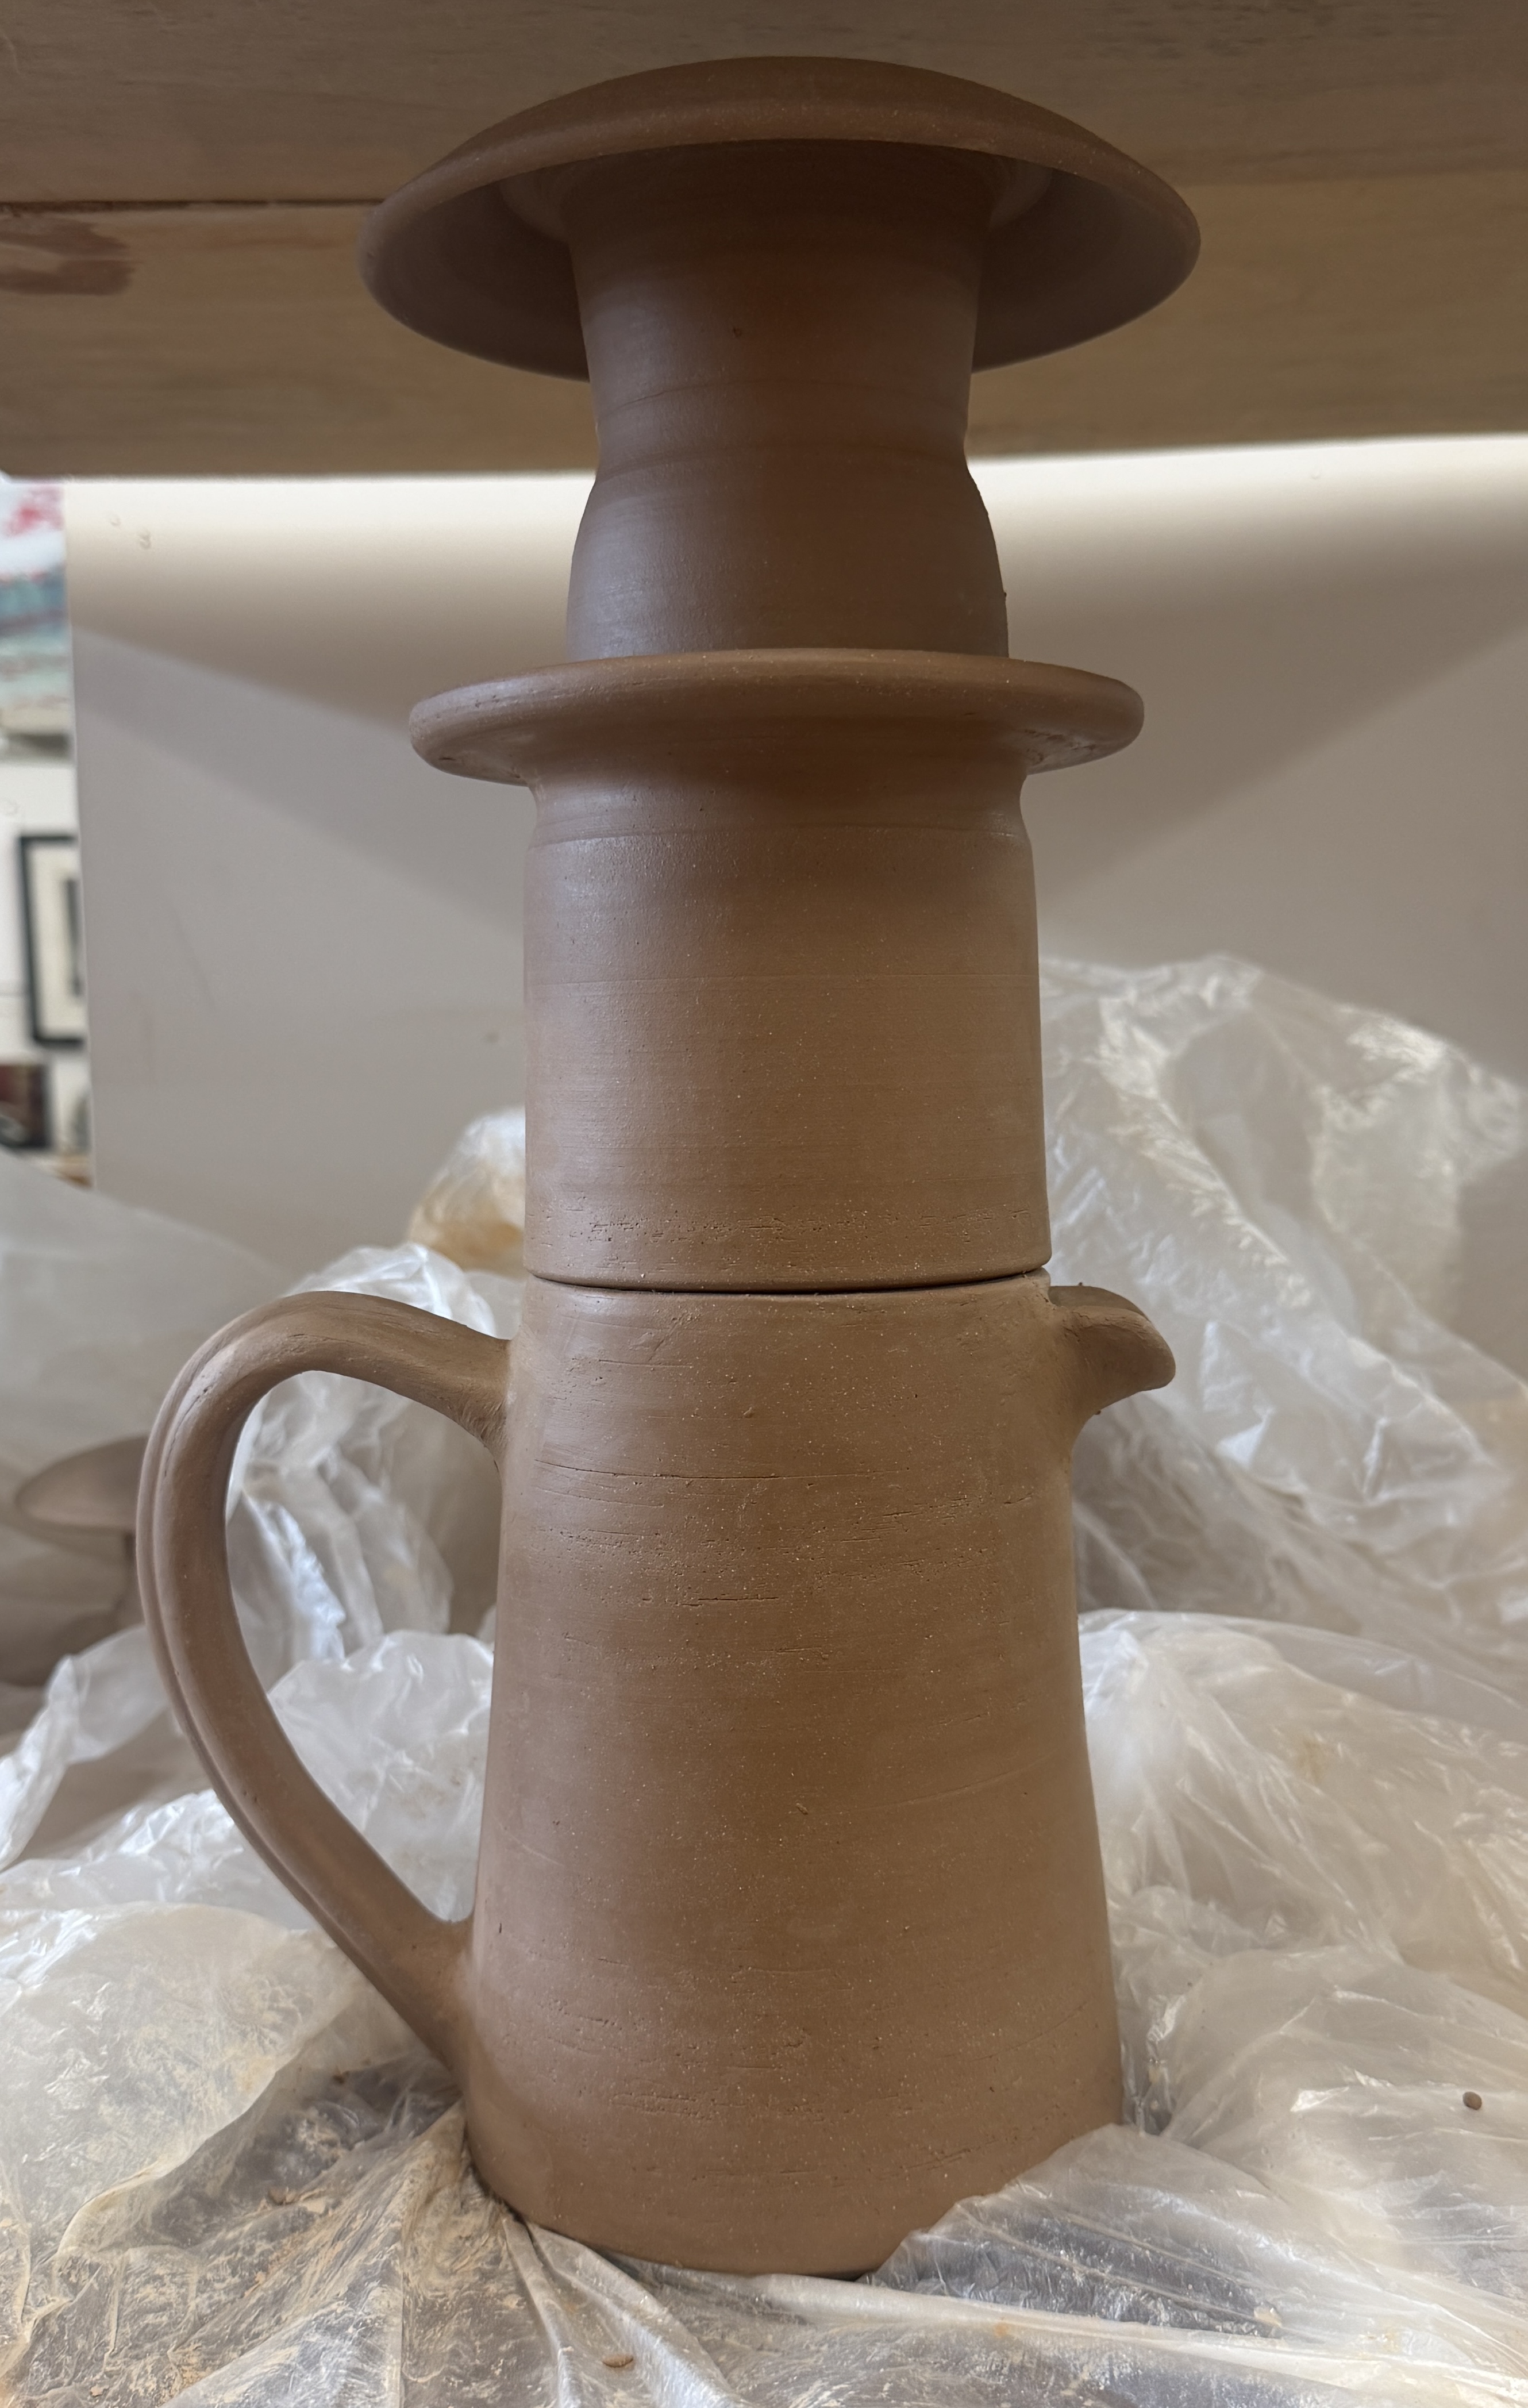
In the future, I would love to do this again! Next time, I would make it five separate pieces so I can better control the cups, since they’re not practical when attached to saucers. I absolutely love how the pitcher piece came out, though. I think it will be pretty successful in practice, and it looks really cute, so I’m happy with it.
After the success of the pitcher set, I was confident I could execute my jewelry holder idea without any problems. Luckily, I was right, and I’m absolutely in love with the result! Again, the process of throwing the pieces was relatively the same, and most of the work came after the fact. First, I made the holes around the dome piece for earrings to hang. Then I made notches for the necklaces to sit in and, not pictured, small posts on the inside so the necklaces wouldn’t fall off. Lastly, I made the holes around the piece below the dome to store stud earrings. Luckily, I bought tools to make the holes before starting this project, because the holes would have looked so messy if I hadn’t. The only thing that might be a tiny bit off is the spacing between the holes because I eyeballed it. I haven’t figured out a way to measure it accurately, so that’s definitely something I would look into for next time. I’m also happy I remembered to account for the glaze’s thickness when choosing hole size, because the glaze could have filled the holes if I hadn’t. Here are some pictures: before I made additions, in the middle of the additions, testing how it would look with jewelry actually on it, and finally, completely finished.


As I said, I’m in love with this lighthouse. I think this is not only a beautiful piece, especially when imagined glazed, but also serves a practical purpose. I’ve already gotten a lot of requests from friends and family for more of these, so I’m excited to continue making them. I’ll definitely be brainstorming ways to improve the functionality, but I’m honestly really happy with it as is. A couple of things I’ve considered adding are stacking bowls instead of a single tall base, so more jewelry can be stored inside. For example, a place to store rings, because I can’t think of a practical way to display them on the outside. I’ll definitely sketch out some ideas and show you all in my next post!
Well, that’s all I have for now. I’m excited for the next couple of weeks as I hone in on this lighthouse series! I’m also super excited for this week because I should be getting a LOT of pieces out of the glaze kiln. I’ll be sure to take pictures for you all! As always, thank you so much for reading. I hope you enjoyed! I can’t wait to come back with more updates for you all! Stay creative, everyone 🙂
-Jenna