I’ve mentioned in a past blog post my hesitance about pursuing ceramics initially, but I’ve never talked about the specifics. This week, I want to discuss one of the biggest parts of my relationship with ceramics: glaze. Going into my first ceramics course at Marywood University, I thought glazing would be my favorite part of the process. But I didn’t give it much of a chance before deciding I disliked it. All I wanted to do was throw on the wheel, focusing on form. I experimented with glaze very little, only using underglaze on one or two of my pieces. Most of my pieces by the end of the semester were just dipped in a glaze, the form being the star of the show.
Going into my Ceramics III course, I had a very similar mentality, but I knew I wanted to try my best to give glaze a chance. After all, the glazing process is just as important as making the form. So, I started the semester getting back in the groove of throwing after a month away. I wasn’t producing many pieces I loved, but I kept some occasionally that I thought were interesting and some to have for glaze experiments. I ended up with many pieces on my shelf that needed to be fired and glazed before my portfolio review, and I had no idea what I wanted to do with them. I knew I wanted to experiment, so I just let whatever happened happen. I underglazed a good amount of pieces, but some of the pieces I knew would look the best just being dipped in glaze. So here are some pieces I liked and some things I learned from my trials.
My favorite piece from this group is a piece that goes in conjunction with a piece I made last semester, and I love the way they look together. The forms use indentations to create an almost wavy surface, and their shapes mirror each other. I used a glaze called angel eyes, which can look blue or orange/brown depending on the thickness of the glaze and the sharpness of the clay surface. So, on my pieces, the color is blue for the smoother areas of the surface, but on the sharper edges of the indentations, the glaze is orange/brown. I love the complementary blue and orange look, so this glaze is a favorite of mine. I don’t have a great photo of the recent one, but the piece from last semester has a great-quality photo taken by my amazing instructor, Mark Chuck.


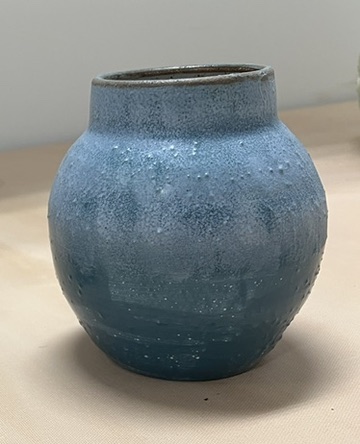
Next, I had no glazing plans for this large slightly asymmetrical vase I made, so I decided to mix a random color of underglaze and apply it to the entire surface. I used more coats towards the bottom to see what would happen. I was surprised by the result when it came out of the kiln. The surface was imperfect, presenting many blisters or bubbles in the glaze. There was also a difference between the results of the top versus the bottom of the pot. The top almost had a frosted or snowy window effect, and the bottom had a flatter, more straight color effect. Even though it was an “imperfect” glaze job, I loved the results and think the surface texture is a fun addition. After talking with Mark Chuck about the results, he suggested airbrushing the underglaze on the pot to avoid blistering. I did not even know that was an option, so I’m glad I learned about that through this experimentation.
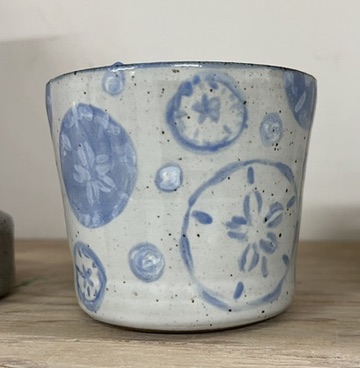
Last but not least, I experimented with drawing designs with the underglaze. It’s hard! Getting an even coat is difficult because the underglaze dries on the surface almost immediately. It’s also hard to “erase” a mistake. Regardless, I enjoyed the process because I hadn’t done something like this before. I love the sand dollar pattern I chose for this vase, and I also enjoyed the various sizes. I did each one differently, whether it was the thickness or quality of the line, because, again, these were all experimental in some way. They’re fun to look at and almost have a watercolor effect. I will definitely be experimenting more with underglaze designs in the future.
Those weren’t all the pieces I glazed, they were merely a few standouts, but I learned a lot from those few. Now that I’ve seen these pieces out of the kiln, I have many more ideas for pieces I want to make. I’m excited to see what I’ll create next and how my future experiments will turn out. Oh, and if you were wondering, my portfolio review went great. There were no hiccups! A huge relief!
Thanks for tuning in, I hope you have a great week!
-Jenna
Nice post 🌅🌅
Thank you!
This is awesome!! If you put angel eyes over yellow salt it leaves a beautiful cornflower blue color if you ever want to try that in the future <3
Great idea! I love blue hues on the darker clay, so I’ll definitely try that out in the fall. Thank you!