In my Digital Design class, with Sue Jenkins, we were assigned to create gift tags for almost any occasion. I, being me, of course, chose Halloween, especially because it is October, so it is very fitting. I also chose to do a three-dimensional design, yet again because it is me and I favor three-dimensional art.
An important part of this project is the gift tags presentation, which I had a great idea to enhance. On my presentation board, I will be securing candy bags filled with Halloween-themed candies from which my gift tags will be tied to. Here are my sketch ideas.
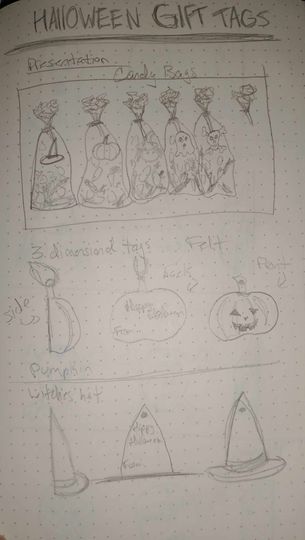
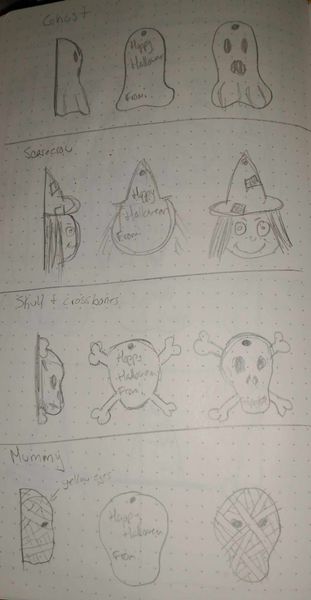
As for my gift tags, we are required to have six separate designs that still have unity between them. So, for mine, I chose six Halloween-themed characters: Jack O’Lantern, a Witches hat, a Ghost, a Scarecrow head, a Skull with Crossbones, and a Mummy.
So, to start, I made multiple trips to the Dollar Tree to pick up various materials, including some Halloween decorations that I will repurpose. My main material is felt, which is what will primarily be seen.
My first step was creating the bases of each tag. Since half of each tag will be 3D and the other half will be 2D, each of the bases will need to be cut in half. So, for the Jack O’Lantern I purchased a small Styrofoam pumpkin, for the witches hat, I bought regular Styrofoam and carved the shape out, same with the scarecrow. For the ghost, I used half a Styrofoam ball and fabric which I soaked in a mixture of white glue and water and created a ghost shape. The skull and crossbones I made using a small plastic skull head as well as larger plastic forearm bones, and for the mummy, I used a larger plastic skull. All of which I made sure were generally the same size, for unity.
Once established, I began to adhere to the felt. I carefully chose each of the colors to match and used hot glue. A lot, of hot glue. Also, be careful when using X-Acto knives, or any kind of sharp, because so far I have cut myself twice through the duration of this project.
Here is a photo of my progress thus far. I am not looking forward to putting the scarecrow together. Don’t mind my messed up desk.
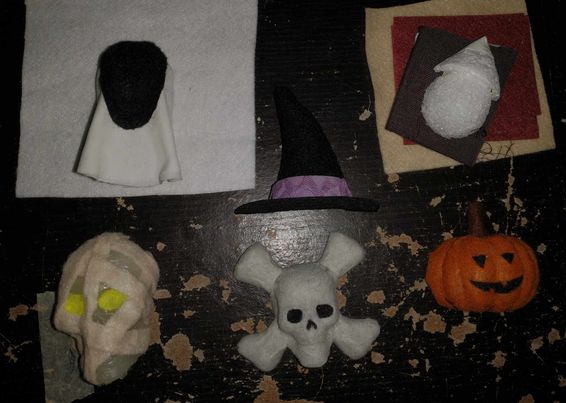
For the mummy, I was going to completely cover it in felt, but it didn’t look good when I was testing it, so, before adhering to the felt, I applied little hot glue strings across the skull to add more detail, like rotting flesh.
For the actual paper tag part, I scanned the backs of my bases and opened them into Adobe Illustrator, made an outline of each, and added a Monster Mash type font designed by John Roshell that I downloaded from the Adobe website.
Here is a test print.

I have since made changes to the print, but this is generally what it will look like.
And here is what it will look like when applied to the tags.

I have not yet completed this project, but the outlook is good.
I don’t think I will be making holes at the top for the string because I believe that will be too difficult, so instead I plan to glue the string between the paper and the bases.
So, that is all I have for today. I hope you enjoyed and there will be more spooky blogs to come!